I had seen a nursing shirt online and thought that I could replicate it fairly well to avoid paying the outrageous price and shipping fee. So I set to work. I made my shirt sleeveless because I get hot very easily and I would rather layer with a lightweight cardigan. Here’s a basic tutorial to make your own!
First I laid out the fabric and used a shirt that I liked the fit of for the the pattern. It’s important to use similar fabric for the shirts.

Here’s the outline of the basic form. I cut on a fold to make it easier on myself.

On the second attempt I found it’s easier to cut three pieces the same size. The back you are going to leave alone.
 The piece you are going to use for the undershirt of the front you want to cut the arms in a bit more otherwise it’s going to dig in to your armpits (no fun). On this piece you are also going to cut a VERY deep V. You want it to be deep enough that you can nurse comfortably from either breast by moving the V to the side. I also have mine cut with a scoop and then the V. You are wanting almost a shelf effect.
The front piece you are going to shirr will have the same arm cuts as the undershirt piece. Cut a neckline that you are happy with for the piece as well. I went with a basic scoop because it was easy and I was trying to figure out if I could make this work.
Start sewing the undershirt piece neckline. I did a small rolled hem. 
Now shirr the front piece. (If you don’t know how to this is a great tutorial and how I learned.) I started about three inches down on each strap and continued until the crest of my bust line. After you’ve shirred to your heart’s content hem the sides. The last 3-4 inches on the bottom of each side you will want to leave unhemed because they will be sewn into the sides of the shirt to connect everything better. Hem the bottom of the piece.
**Your front piece will not be this wide. I made a mistake when I cut this and made it WAY too big.**
Sew the front pieces together; at the shoulders and the bottom. You’ll use a 1/4 inch seem. 

Now it’s time to sew all three pieces together. You’ll want to use a 5/8 inch seem. Make sure that when you are putting everything together make sure your sandwich is back piece, shirred front, undershirt piece. The shoulders are going to be sewn together and sides. You’ll also hem around the arms and bottom.
Almost finished! Add a piece of elastic on the “shelf” you’ve created so that you won’t become exposed on accident. Keep in mind where you put the elastic because when you nurse it’s going to go over or under your breast. 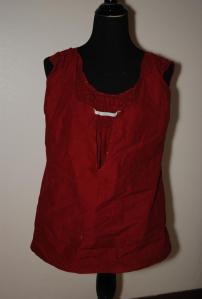
After I was finished and tried everything on I decided to take it in a bit and added two darts on the back. 
Now that I had made a few minor adjustments here was the final product! 
And it opens nicely to the side for easy access. 
This was probably not the best tutorial but it’s the first I’ve ever done. I think if you know how to sew it’s easy enough to figure out on the fly. I’d love to see what you’ve done with the skeleton pattern here!
Happy Crafting!!
 I had bought this fabric a few months ago with the scarf in mind. To get the length I was wanting I bought two yards and cut the fabric in half lengh-wise to keep it from being overly bulky.
 I LOVE my scarf. I’m hoping for some extra money to buy the same fabric in other colors so I have some more options; alas bill paying comes first.
  American Apperal makes this scarf and has this great idea brochure on ways to wear it. So far I’ve kept it simple. If you have other ways you wear your circle scarf I’d love to see them!